Mimicking the iOS system notification in SwiftUI
Jan 17, 2023 ·
In this post, I’ll show how you can use the SystemNotificaton open-source library to mimic iOS system notifications in your SwiftUI apps.
What is SystemNotification?
SystemNotificaton is a SwiftUI SDK that lets you mimic the native iOS system notification, which is presented when you toggle silent mode on & off, connect your AirPods, etc.

This makes it possible to create notifications that behave almost like the native ones, which means that your app-specific notifications or hints can look right at home in iOS.
The SDK supports iOS, macOS, tvOS, watchOS, and VisionOS, which means that you can use the same notification engine on all platforms.
Getting started
You must first add SystemNotificaton to your project with the Swift Package Manager. You can then apply .systemNotification just like you apply .sheet, .alert & .fullScreenModal:
import SystemNotification

struct MyView: View {

    var body: some View {
        Text("Hello, world")
            .systemNotification(...)
    }
}
You can use both state- and context and message-based notifications, use pre-defined or custom views and style your notifications to great extent.
State-based notifications
State-based notifications work just like state-based sheets, alerts and modals. Just provide the .systemNotification modifier with an isActive binding and the view to present:
struct MyView: View {

    @State
    private var isActive = false

    var body: some View {
        List {
            Button("Show") { isActive = true }
            Button("Hide") { isActive = false }
            Button("Toggle") { isActive.toggle() }
        }
        .systemNotification(
            isActive: $isActive,
            content: notificationView
        )
    }

    func notificationView() -> some View {
        Text("This is a custom notification")
            .padding()
    }
}
State-based notifications are easy to use, but context-based ones are much more versatile.
Context-based notifications
Context-based notifications work similar to sheet, alert and fullScreenModal, but uses an observable SystemNotificationContext instead of state:
struct MyView: View {

    @StateObject
    private var notification = SystemNotificationContext()

    var body: some View {
        List {
            Button("Show notification", action: showNotification)
            Button("Show orange notification", action: showOrangeNotification)
        }.systemNotification(notification)
    }

    func showNotification() {
        notification.present {
            Text("This notification uses a standard configuration")
                .padding()
        }
    }

    func showOrangeNotification() {
        notification.present(
            configuration: .init(backgroundColor: .orange)
        ) {
            Text("This notification uses a custom configuration")
                .foregroundColor(.white)
                .padding()
        }
    }
}
The context-based approach lets you use a single context and modifier to present different notifications from anywhere in your app.
You can apply a context-based notification to a root TabView or NavigationView to ensure that it’s presented above all other content, regardless or where it’s triggered.
Sheets and full screen covers require a new modifier, but you can use the same context. Also consider the platform when picking a proper notification approach.
For instance, iPad sheets are presented as square modals in the center of the screen, so a system notification may not be the best solution there.
Context-based notifications are versatile and a great choice if you want to present many different notifications with a single modifier.
Message-based notifications
Message-based notifications mimic the native iOS look and feel, with a leading tinted icon, a title and a message. To mimic this notification, just use a SystemNotificationMessage:
struct MyView: View {

    @StateObject
    private var notification = SystemNotificationContext()

    var body: some View {
        List {
            Button("Show notification", action: showNotification)
        }.systemNotification(notification)
    }

    func showNotification() {
        notification.present {
            SystemNotificationMessage(
                icon: Image(systemName: "bell.slash.fill"),
                title: "Silent Mode",
                text: "On",
                style: .init(iconColor: .red)
            )
        }
    }
}
The style parameter lets you modify the message style, colors, spacings etc. However, this only styles the message, not the notification. For that, use a SystemNotificationStyle.
How to style a system notification
A SystemNotification can be styled in a couple of ways. For instance, you can provide a style in the view modifier, when you apply a system notification to a view:
struct MyView: View {

    @StateObject
    private var notification = SystemNotificationContext()

    var body: some View {
        List {
            ...
        }.systemNotification(
            notification,
            style: .init(backgroundColor: .red)
        )
    }
}
This will be used as the default style, and applied to all notifications. You can however override this style whenever you present a notification with a context:
notification.present(
    style: .init(backgroundColor: .green)
) {
    Text("A green message")
        .foregroundColor(.white)
}
This custom style is applied for as long as the notification is presented, then reset to the default style.
How to configure a system notification
Just like with the style, a SystemNotification can be configured in a couple of ways. For instance, you can provide a configuration in the view modifier:
struct MyView: View {

    @StateObject
    private var notification = SystemNotificationContext()

    var body: some View {
        List {
            ...
        }.systemNotification(
            notification,
            configuration: .init(duration: 5)
        )
    }
}
This will be used as the default configuration, and applied to all notifications. You can however override it whenever you present a notification with a context:
notification.present(
    configuration: .init(duration: 10)
) {
    Text("An important, long-lived notification")
}
This configuration is applied for as long as the notification is presented, then reset to the default one.
Putting things together
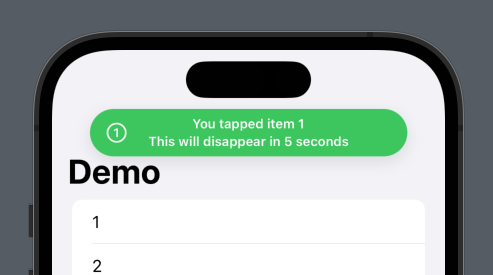
To wrap things up, let’s present a system notification that looks like a iOS notification, but has a green background color, white content and stays longer on the screen.
All you need to do is to create a context and present it with a custom config and style:
struct Preview: View {

    @StateObject
    private var notification = SystemNotificationContext()

    var body: some View {
        TabView {
            NavigationView {
                List {
                    ForEach(1..<100, id: \.self) { item in
                        Text("\(item)")
                            .onTapGesture {
                                notification.present(
                                    configuration: .init(duration: 5),
                                    style: .init(backgroundColor: .green)
                                ) {
                                    SystemNotificationMessage(
                                        icon: Image(systemName: "\(item).circle"),
                                        title: "You tapped item \(item)",
                                        text: "This will disappear in 5 seconds",
                                        style: .init(
                                            iconColor: .white,
                                            textColor: .white,
                                            titleColor: .white
                                        )
                                    )
                                }
                            }
                    }
                }.navigationTitle("Demo")
            }.tabItem { ... }

            Text("2").tabItem { ... }
            Text("3").tabItem { ... }
            Text("4").tabItem { ... }

        }.systemNotification(notification)
    }
}
When we present this, the notification is presented over the NavigationView with some additional padding to the dynamic island:
To verify that the notification is also presented over the TabView, we can adjust the style to use the bottom edge instead of the default top:
.onTapGesture {
    notification.present(
        configuration: .init(duration: 5),
        style: .init(
            backgroundColor: .green,
            edge: .bottom
        )
    ) {
    ...
    }
}
When we present this, the notification is presented over the TabView as well:
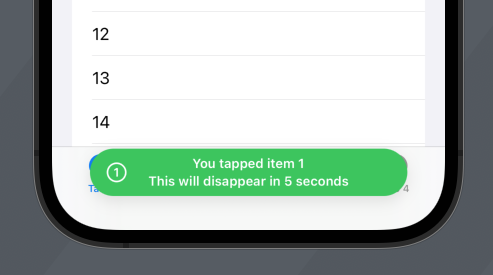
As a bonus, you can use the same context in all tabs. The notification will be presented above the TabView, which means that it will not disappear when you change tab.
Conclusion
The SystemNotificaton library can be used to mimic iOS system notifications on all major Apple platforms. If you give it a try, I’d be very interested in hearing what you think.
Discussions & More
If you found this interesting, please share your thoughts on Bluesky and Mastodon. Make sure to follow to be notified when new content is published.