Doxygen - A brief tutorial
I’m using Doxygen to generate a web-based documentation for various .NET projects. This post shows how to configure Doxygen to achieve this.
Doxygen supports extracting the documentation in various formats (HTML, LaTex, .man, XML etc.). To extract a basic HTML site from your documentation, just follow these steps:
- Download and install Doxygen.
- Run the Doxygen wizard.
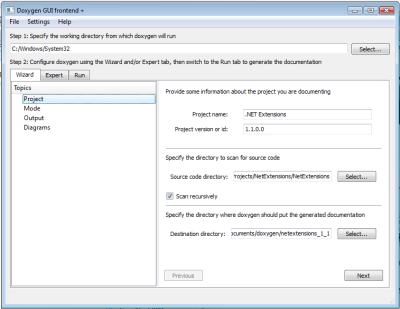
- In the Wizard tab, open the “Project” section.
- Define Project name (e.g. “.NET Extensions”).
- Define Project version or id (e.g. “1.0.0.0”).
- Define Source code directory (your source code root).
- Check the “Scan recursively” check box.
- Define Destination dictionary (where to extract the documentation).
- Under “Mode”, select All entities and Optimize for Java or C#.
- Under “Output”, select the various output formats you want Doxygen to create.
Since you selected “All entities”, you may think that Doxygen will include all entities. That’s sadly not the case. For instance, it won’t include static classes unless we explicitly tell it to.
To fix this, select the “Expert” tab and check the EXTRACT_STATIC checkbox. If not, you will find that static members are omitted from the documentation.
You can configure Doxygen in detail, then select the “Run” tab and click “Run Doxygen” to start Doxygen, which will generate the documentation in the specified destination folder.
If you think that the documentation is too plain and boring in HTML format, you can skin it with CSS. The possibilities are endless.
Discussions & More
Please share any ideas, feedback or comments you may have in the Disqus section below, or by replying on Twitter or Mastodon.
If you found this text interesting, make sure to follow me on Twitter and Mastodon for more content like this, and to be notified when new content is published.
If you like & want to support my work, please consider sponsoring me on GitHub Sponsors.