Customizing the macOS About Panel in SwiftUI
Nov 28, 2023 ·
In this post, we’ll take a look at how to customize the macOS About Panel in SwiftUI, by using project settings, bundle files, and SwiftUI-specific tools.
For more information about customizing the macOS menu bar, I have also written a post about how to customize the macOS menu bar in SwiftUI.
Background
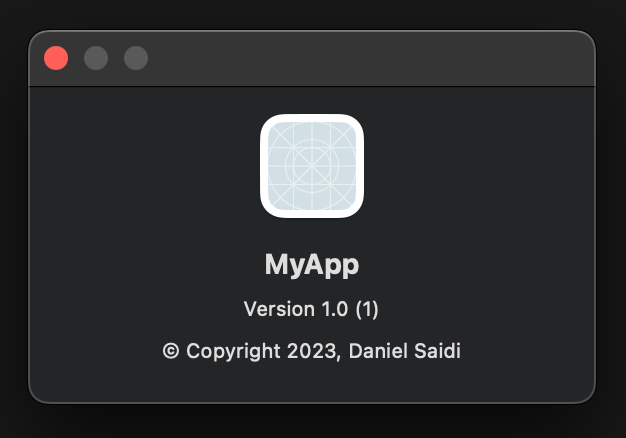
As an example, let’s create a brand new SwiftUI app and call it “MyApp”. When running the app, the main menu will have a default “About…” item that opens the app’s about panel:
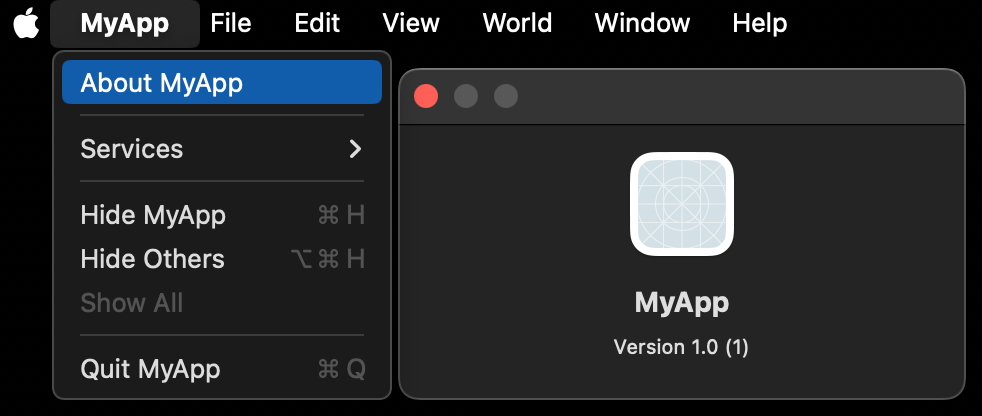
This panel will by default show the app icon, name, build number and version number. If we add an app icon to our app, it will automatically be applied without any code needed.
There are however things that we may want to adjust. For instance, the display name should be “My App”, not “MyApp”. We may also want to display additional information, like copyright.
How to customize the app display name
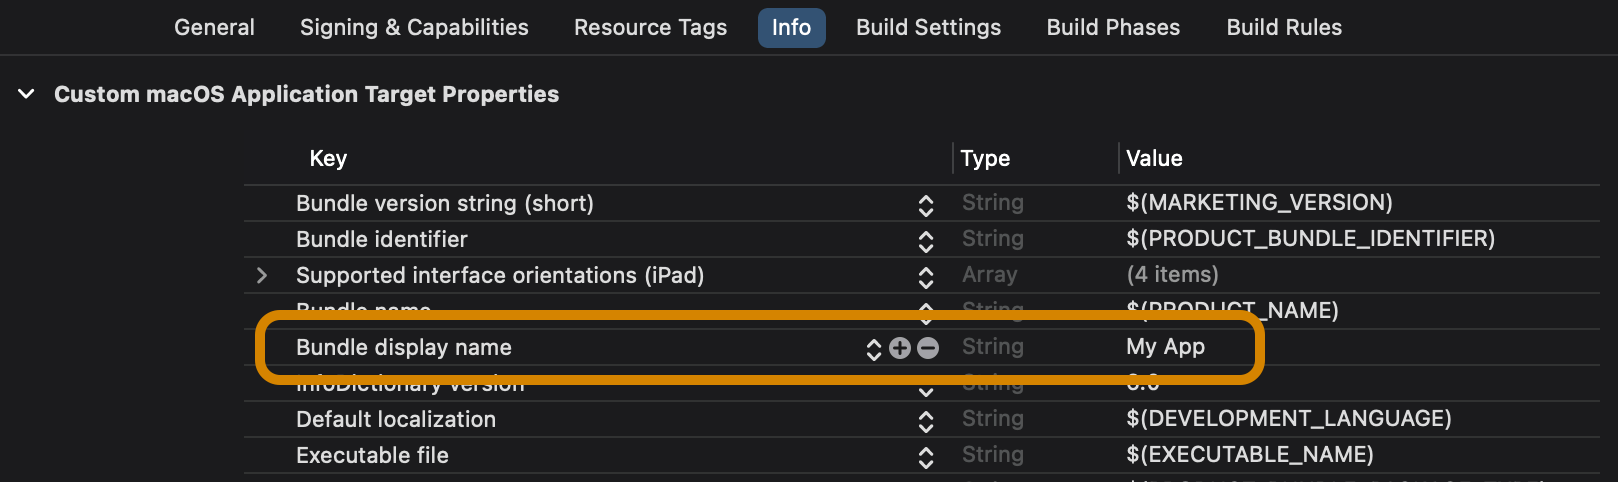
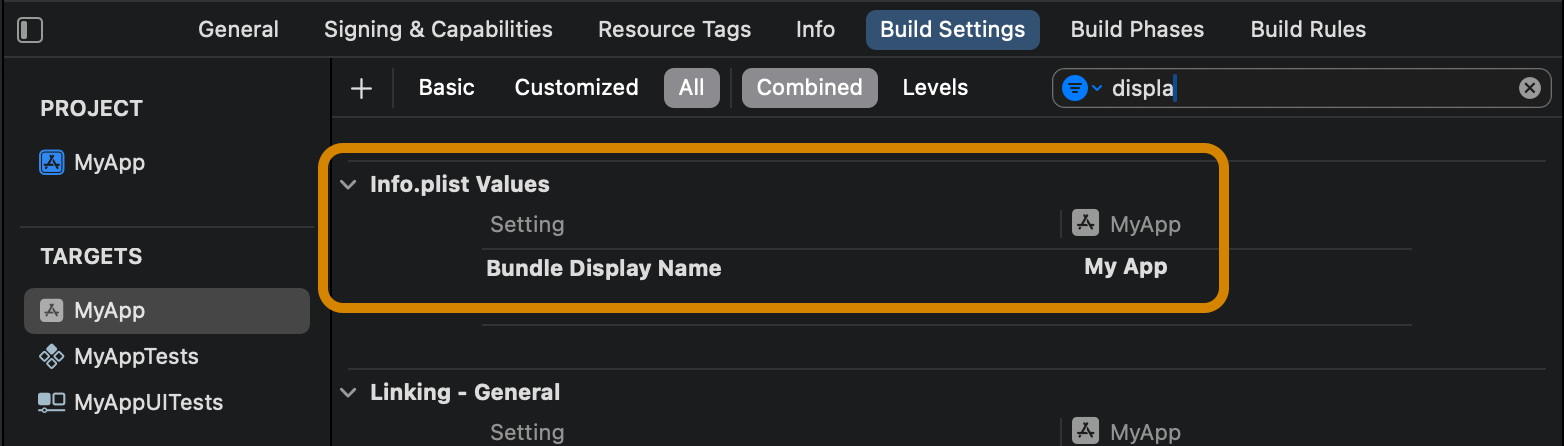
The project name “MyApp” is the default display name for the app. Let’s change the display name to “My App” in Project Settings to see what happens.
We can either do this under the “Info” tab:
or in Build Settings:
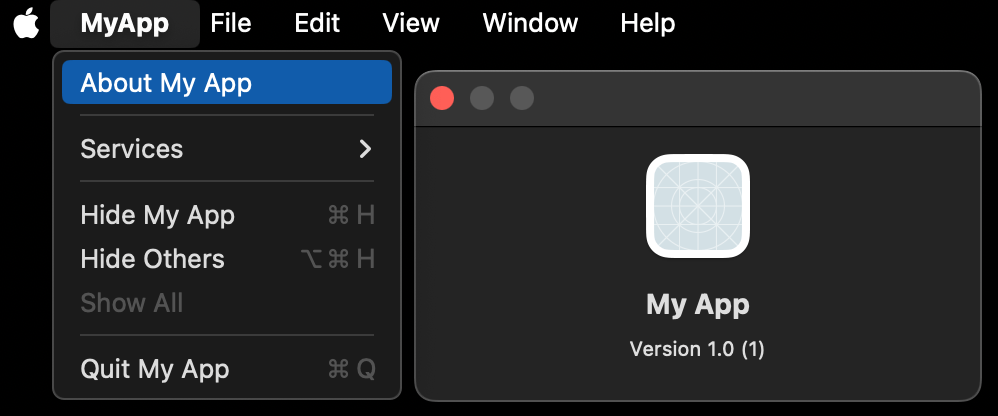
If we run the app with this new display name, the main menu and about panel will still say “MyApp”, while the menu item that opens the about panel says “About My App”.
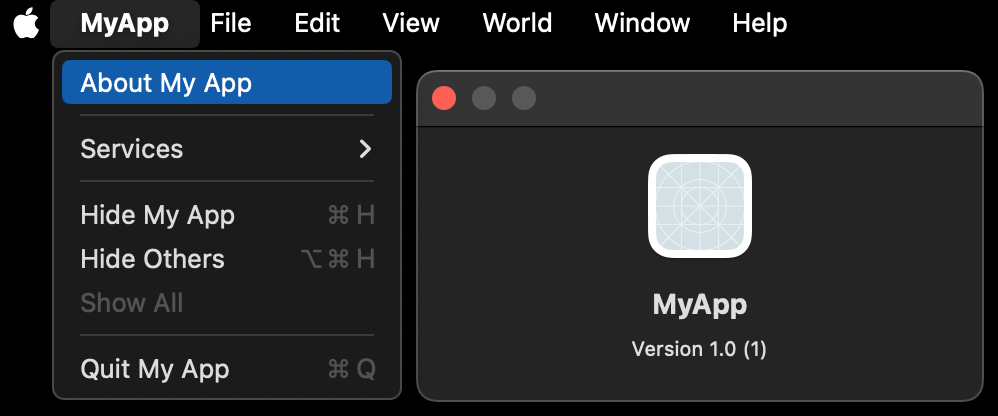
So, the main menu and its about panel seem to use the project name and ignore the display name, while the “About My App” menu item seems to use it.
While there may be ways to fix this with settings, let’s look at how to customize the About Panel to show custom content, with and without code.
How to customize the about panel without code
Although I haven’t found a way to change the app display name in the about panel without code, there are some things that you can change with build settings and files.
Copyright
Any copyright text that you add in Build Settings automatically appears in the about panel:

If you add this, the about panel will show the information like this:
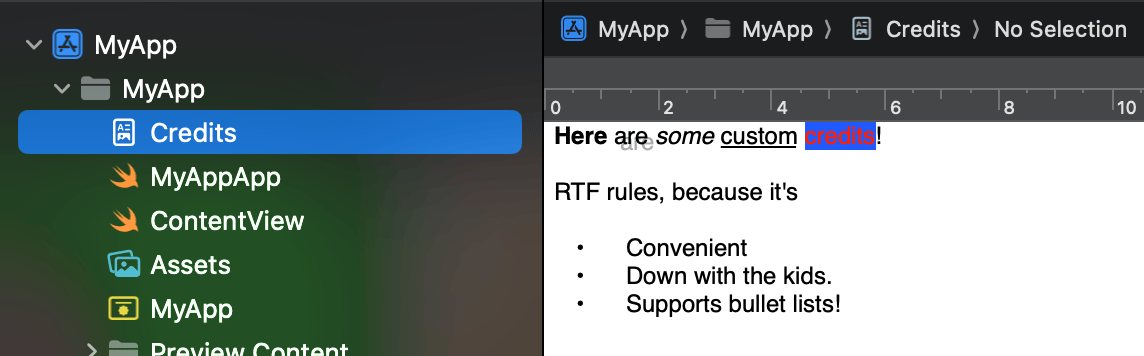
Credits
You can also provide custom credits (credits to @troz and @casecollection) for the app, by adding a credits.rtf or credits.html file to your app.
Here, we add an RTF file with some rich text content:
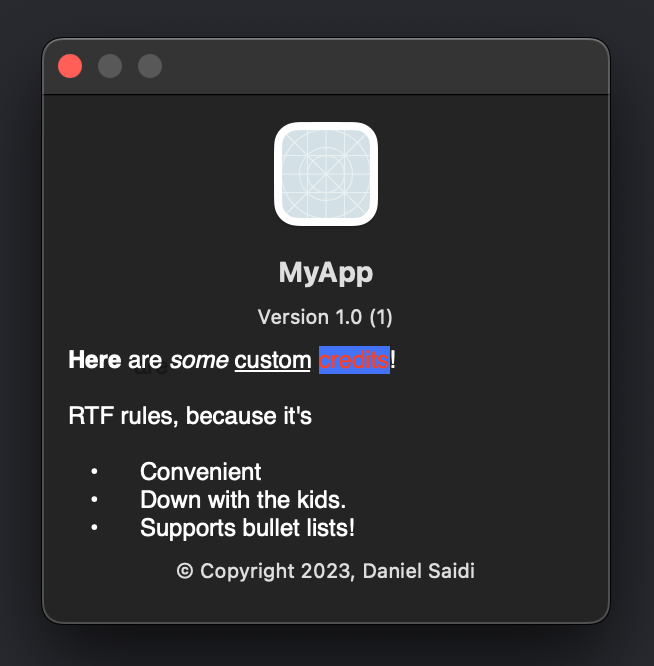
If you add this, the about panel will show the information like this:
However, if you want the credits to contain dynamic content, you need to define this info with code.
How to customize the about panel with code
To customize the About Panel with code, we’ll use the same techniques as we looked at in this post, on how to customize the main menu commands of an app.
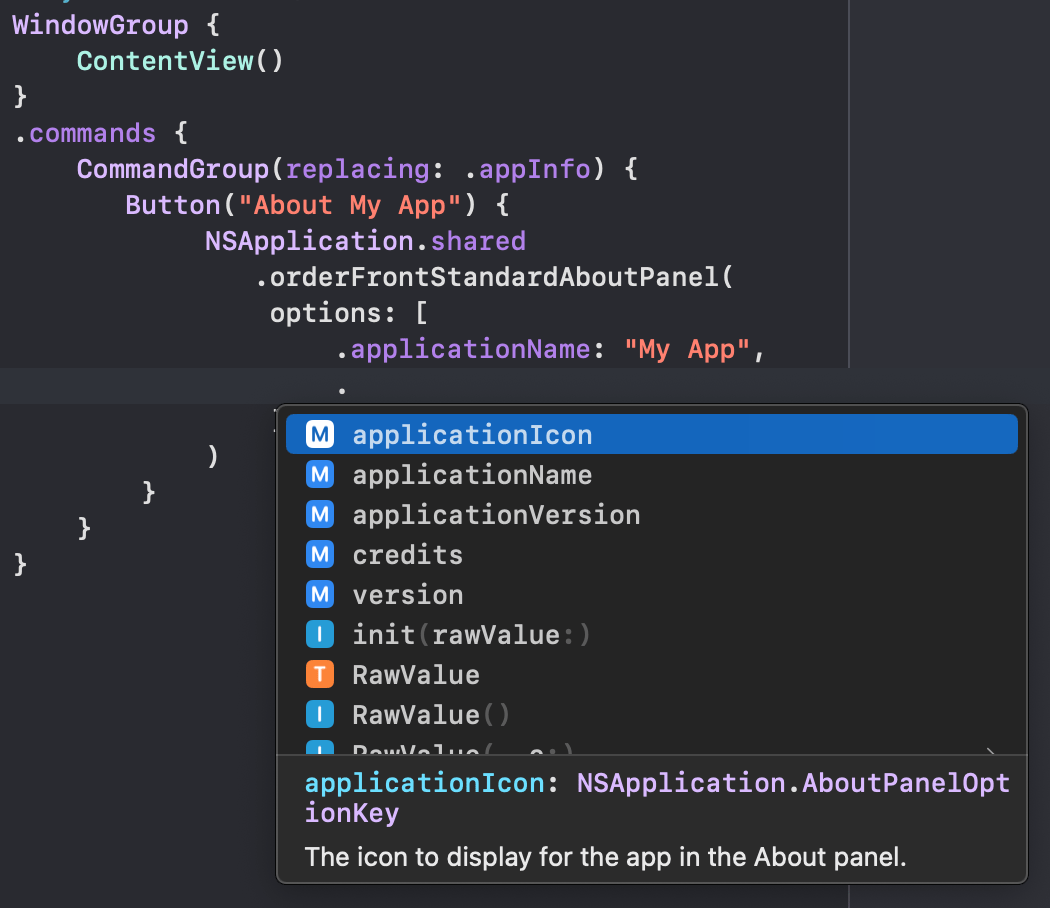
We must replace the default about button with one that calls an NSApplication function that’s called orderFrontStandardAboutPanel, which opens an About Panel with custom options:
@main
struct MyAppApp: App {

    var body: some Scene {
        WindowGroup {
            ContentView()
        }
        .commands {
            CommandGroup(replacing: .appInfo) {
               Button("About My App") {
                    NSApplication.shared
                       .orderFrontStandardAboutPanel(
                            options: [.applicationName: "My App"]
                        )
                }
            }
        }
    }
}
This code replaces the .appInfo menu item with a custom menu item that overrides the app name:
We can use these options to override applicationInfo, applicationName and applicationVersion, as well as credits and version (build number):
The version row disappears if you set applicationVersion and version to empty strings and adjusts itself if you set either value to an empty string.
The credits value is presented below the version. Notice that this is an attributed string. Your app will actually crash if you set it to a plain string:
@main
struct MyAppApp: App {
var body: some Scene {
WindowGroup {
ContentView()
}
.commands {
CommandGroup(replacing: .appInfo) {
Button("About My App") {
NSApplication.shared
.orderFrontStandardAboutPanel(
options: [
.applicationName: "My App",
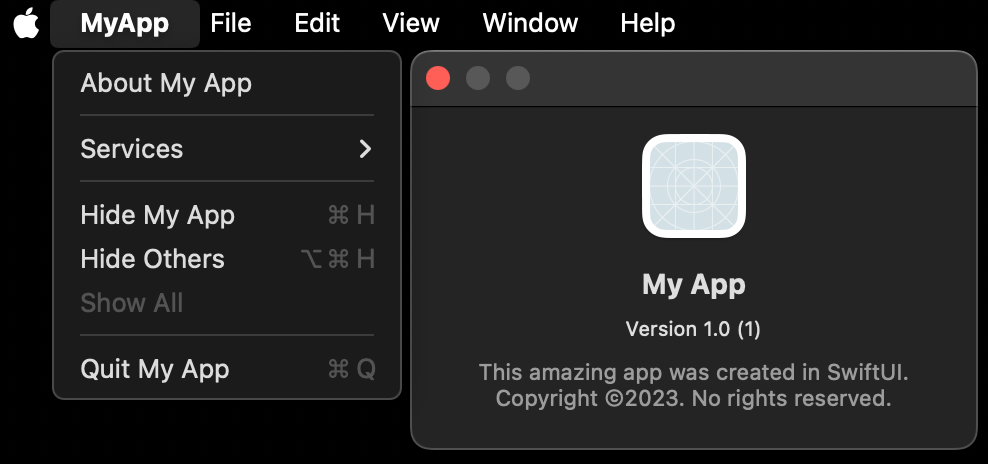
.credits: NSAttributedString(
string: "This amazing app was created in SwiftUI.\nCopyright ©2023. No rights reserved.",
attributes: [
.foregroundColor: NSColor.secondaryLabelColor,
.font: NSFont.systemFont(ofSize: NSFont.smallSystemFontSize)
]
)
]
)
}
}
}
}
}
Yikes, I don’t like that indentation! Let’s specify it in another way to make the code cleaner:
@main
struct MyAppApp: App {

    var body: some Scene {
        WindowGroup {
            ContentView()
        }
        .commands {
            CommandGroup(replacing: .appInfo) {
               Button("About My App") {
                    NSApplication.shared
                       .orderFrontStandardAboutPanel(
                        options: .basic(
                            applicationName: "My App",
                            credits: "..."
                        )
                    )
                }
            }
        }
    }
}

public extension Dictionary
    where Key == NSApplication.AboutPanelOptionKey, Value == Any {

    static func basic(
        applicationName: String,
        credits: String
    ) -> Self {
        [
            .applicationName: applicationName,
            .credits: NSAttributedString(
                string: credits,
                attributes: [
                    .foregroundColor: NSColor.secondaryLabelColor,
                    .font: NSFont.systemFont(ofSize: NSFont.smallSystemFontSize)
                ]
            )
        ]
    }
}
If we run the app again, we now have custom credits with a custom style in place as well:
We can improve this further, by creating a command that can be reused in many apps:
public struct AboutPanelCommand: Commands {

    public init(
        title: String,
        applicationName: String = Bundle.main.displayName,
        credits: String? = nil
    ) {
        let options: [NSApplication.AboutPanelOptionKey: Any]
        if let credits {
            options = [
                .applicationName: applicationName,
                .credits: NSAttributedString(
                    string: credits,
                    attributes: [
                        .foregroundColor: NSColor.secondaryLabelColor,
                        .font: NSFont.systemFont(ofSize: NSFont.smallSystemFontSize)
                    ]
                )
            ]
        } else {
            options = [.applicationName: applicationName]
        }
        self.init(title: title, options: options)
    }

    public init(
        title: String,
        options: [NSApplication.AboutPanelOptionKey: Any]
    ) {
        self.title = title
        self.options = options
    }

    private let title: String
    private let options: [NSApplication.AboutPanelOptionKey: Any]

    public var body: some Commands {
        CommandGroup(replacing: .appInfo) {
            Button(title) {
                NSApplication.shared
                    .orderFrontStandardAboutPanel(options: options)
            }
        }
    }
}

public extension Bundle {

    var displayName: String {
        infoDictionary?["CFBundleDisplayName"] as? String ?? "-"
    }
}
This lets us reduce the amount of code in our app to the following:
@main
struct MyAppApp: App {

    var body: some Scene {
        WindowGroup {
            ContentView()
        }
        .commands {
            AboutPanelCommand(
                title: "About My App",
                credits: "This amazing app was created in SwiftUI...."
            )
        }
    }
}
In the code above, we use the simplified initializer to define credits as plain text. If we want to specify a custom atttributed string, we have that option as well.
Conclusion
While I like SwiftUI’s APIs for working with menu commands, the About Panel stuff is a bit hidden. I hope that they bring a more native approach in a future SwiftUI update.
I’d also love to see the limitations of the attributed string capabilities. The first to make Doom run in the credits text field (someone made it run in the touch bar) wins a prize.
Discussions & More
If you found this interesting, please share your thoughts on Bluesky and Mastodon. Make sure to follow to be notified when new content is published.