Using the SwiftUI 4 ImageRenderer
Jun 20, 2022 ·
SwiftUI 4 introduces a new ImageRenderer that can be used to render any SwiftUI view as an image in iOS 16, macOS 13, tvOS 16 & watchOS 9. Let’s take a look at how it works.
Using the ImageRenderer
The SwiftUI ImageRenderer takes any view as input and outputs a UIImage on iOS, tvOS and watchOS, and an NSImage on macOS.
Using the renderer is very easy and can look something like this:
struct ContentView: View {

    @State
    var snapshot: UIImage?

    var body: some View {
        VStack(spacing: 20) {
            viewToSnapshot("Original")
            if let image = snapshot {
                Image(uiImage: image)
            }
            Button(action: generateSnapshot) {
                Text("Create snapshot")
            }
            .buttonStyle(.bordered)
        }
    }
}

extension ContentView {

    func viewToSnapshot(_ title: String) -> some View {
        VStack(spacing: 5) {
            Image(systemName: "globe")
                .imageScale(.large)
                .foregroundColor(.accentColor)
            Text(title)
        }
    }

    func generateSnapshot() {
        Task {
            let renderer = await ImageRenderer(
                content: viewToSnapshot("ImageRenderer"))
            if let image = await renderer.uiImage {
                self.snapshot = image
            }
        }
    }
}
The code is pretty straightforward. We show a viewToSnapshot together with a button that takes a snapshot of the same view, then shows it below the original view.
We also have to wrap the rendering in a Task, since the ImageRenderer initializer and its uiImage property are both async and must be called using await.
I’m still struggling with using async functionality in SwiftUI, so if you know of a better way to do this, I’d love to hear it.
If we now the code above and tap the button, the generated snapshot image looks like this:
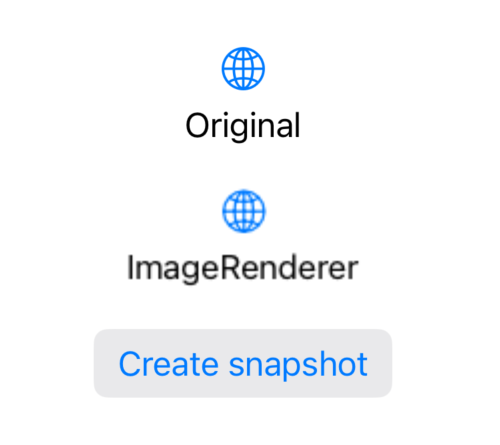
As you can see, the snapshot is quite blurry. This is because the renderer uses a rendering scale of 1 by default, while the device has a retina screen resolution or greater.
Improving the snapshot resolution
To fix the snapshot resolution, we can specify a scale for the renderer, but this is where the async started biting me. Defining a scale in generateSnapshot doesn’t work:
extension ContentView {

    func generateSnapshot() {
        Task {
            let renderer = await ImageRenderer(
                content: viewToSnapshot("ImageRenderer"))
            renderer.scale = await UIScreen.main.scale  // <-- This doesn't work
            if let image = await renderer.uiImage {
                self.snapshot = image
            }
        }
    }
}
If we try to specify a scale as above, we get the error Property 'scale' isolated to global actor 'MainActor' can not be mutated from a non-isolated context.
To fix this, we can move the rendering to a @MainActor annotated extension:
extension ContentView {

    func generateSnapshot() {
        Task {
            await generateSnapshotAsync()
        }
    }
}

@MainActor
extension ContentView {

    func generateSnapshotAsync() async {
        let renderer = ImageRenderer(content: viewToSnapshot("ImageRenderer"))
        renderer.scale = UIScreen.main.scale
        if let image = renderer.uiImage {
            self.snapshot = image
        }
    }
}
This allows us to remove the await from the code and just having to use a single await when we call the main actor function.
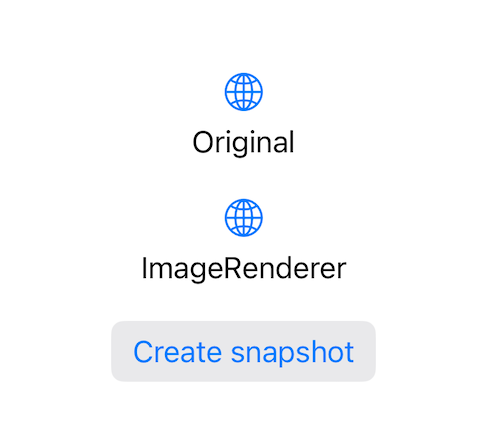
We can now run the app again and see that the result is much sharper:
Just note that watchOS has no access to UIScreen.scale and that must to use nsImage and NSScreen.main?.backingScaleFactor on macOS.
I’m still struggling with using async functionality in SwiftUI, so if you know of a better way to do this, I’d love to hear it and will update the post with any new information I find.
Simplifying the code
I find the @MainActor annotation quite messy. To simplify things, I therefore created two convenience initializers that let me create an image renderer in a more convenient way:
import SwiftUI

@available(iOS 16.0, macOS 13.0, tvOS 16.0, watchOS 9.0, *)
public extension ImageRenderer {

    @MainActor
    convenience init(content: Content, scale: CGFloat) {
        self.init(content: content)
        self.scale = scale
    }

    #if os(iOS) || os(macOS) || os(tvOS)
    @MainActor
    convenience init(contentWithScreenScale content: Content) {
        #if os(iOS) || os(tvOS)
        let scale = UIScreen.main.scale
        #elseif os(macOS)
        let scale = NSScreen.main?.backingScaleFactor ?? 2
        #endif

        self.init(content: content, scale: scale)
    }
    #endif
}
The first lets us provide the image renderer with a custom scale, while the second lets us omit the scale altogether and use the screen resolution on iOS, macOS and tvOS.
Since these two initializers allow us to specify a scale without modifying the renderer, we no longer have to perform the rendering operation within a main actor annotated extension.
This means that we can put all the rendering code back into the snapshot button action:
extension ContentView {

    func generateSnapshot() {
        Task {
            let renderer = await ImageRenderer(
                contentWithScreenScale: viewToSnapshot("ImageRenderer"))
            if let image = await renderer.uiImage {
                self.snapshot = image
            }
        }
    }
}
To avoid having to use uiImage in UIKit (iOS, tvOS & watchOS) and nsImage in AppKit (macOS), we can create a bridging typealias and extend the image renderer to return a platform-agnostic image.
Here’s an ImageRepresentable that resolves to UIImage in UIKit and NSImage in AppKit:
#if os(macOS)
import class AppKit.NSImage

public typealias ImageRepresentable = NSImage
#endif

#if os(iOS) || os(tvOS) || os(watchOS)
import class UIKit.UIImage

public typealias ImageRepresentable = UIImage
#endif
We can now extend the ImageRenderer with a platform-agnostic image property:
extension ImageRenderer {

    @MainActor
    var image: ImageRepresentable? {
        #if os(macOS)
        return nsImage
        #else
        return uiImage
        #endif
    }
}
With this in, we can use the same code to generate an image, regardless of which platform we’re on. The only limitation is that we can’t use the resolution-based init in watchOS.
Conclusion
The new SwiftUI ImageRenderer is great for rendering snapshots of any view. It’s available for iOS 16.0, macOS 13.0, tvOS 16.0 & watchOS 9.0 and can be tested in Xcode 14 beta.
I’m currently struggling with async in SwiftUI. I have therefore added a few ImageRenderer extensions to SwiftUIKit. Feel free to try them out and let me know what you think.
Discussions & More
If you found this interesting, please share your thoughts on Bluesky and Mastodon. Make sure to follow to be notified when new content is published.