Building a rich text editor for UIKit, AppKit and SwiftUI
Jun 13, 2022 ·
In this article, we’ll look at how to extend the rich text support in UIKit, AppKit & SwiftUI by extending native types, adding new types to bridge the different platforms, etc.
This post was originally published as a guest article at the Cindori website. It’s published here as well, to serve as a baseline for future articles about rich text editing.
Background
Rich text editing on Apple’s platforms is pretty straightforward. Just use a UITextView in UIKit, an NSTextView in AppKit, and use NSAttributedString, and they will automatically support fonts, styles, text alignment, image attachments, etc.
No, unfortunately it’s not that easy. Many things are very complicated, and multi-platform support makes things worse, since UIKit & AppKit handle many things quite differently.
Adding SwiftUI to the mix makes it even more complex, since we have to bridge platform-specific views in a way that works on all platforms. We also need some way to let SwiftUI affect the platform-specific views, and for the views to update SwiftUI as well.
All in all, this is quite complicated, which is why I’m happy to announce that my wonderful client Oribi has given me permission to open-source a rich text engine that I have created as part of a project for them.
The result is an open-source library called RichTextKit which you’re able to use in your own projects. Many thanks to Oribi for letting me open-source this!
Designing for multi-platform
When building a multi-platform rich text engine that also supports SwiftUI, I was careful to design the foundation as platform-agnostic as possible. Designing for the unknown is often a vain task, so I just designed it in a way that I thought would made sense for all cases.
Long story short, many assumptions didn’t hold true when I started developing the macOS version. For instance, I assumed that UITextView and NSTextView scrolls in the same way (they don’t). However, having a solid foundation made such adjustments manageable.
One example is how to set up these views. We use UITextView in UIKit and NSTextView in AppKit, but since we have to override things and add rich text-specific functionality, we can create a custom RichTextView view for both platforms:
#if os(iOS) || os(tvOS)
import UIKit

public class RichTextView: UITextView {}
#endif
#if os(macOS)
import AppKit

public class RichTextView: NSTextView {}
#endif
We can only add this to macOS, iOS & tvOS, since UITextView is not available in watchOS.
Furthermore, the UITextView and NSTextView APIs differ a lot. For instance, to get and set the attributed string, UITextView has an attributedText property, while NSTextView has an attributedString() function to get the string and a textStorage property to change it.
To bridge these platform differences, we can extend the views with additional properties, to get the same APIs. I prefer to use protocols to enforce that this is done correctly.
For these views, let’s add a RichTextViewRepresentable protocol:
public protocol RichTextViewRepresentable {

    var attributedString: NSAttributedString { get }
}
Both text views can now implement this protocol by adding an attributedString to them:
#if os(iOS) || os(tvOS)
extension RichTextView: RichTextViewRepresentable {}

public extension RichTextView {

    var attributedString: NSAttributedString {
        get { attributedText ?? NSAttributedString(string: "") }
        set { attributedText = newValue }
    }
}
#endif
#if os(macOS)
extension RichTextView: RichTextViewRepresentable {}

public extension RichTextView {

    var attributedString: NSAttributedString {
        get { attributedString() }
        set { textStorage?.setAttributedString(newValue) }
    }
}
#endif
Using protocols to communicate bridging between platforms is a nice way to make our code cleaner in a controlled way and remove the need for #if checks within the library.
To design SwiftUI for multi-platform use, we can also add a ViewRepresentable typealias that makes platform-specific views easier to define in the library.
#if os(iOS) || os(tvOS)
import UIKit

typealias ViewRepresentable = UIViewRepresentable
#endif

#if os(macOS)
import AppKit

typealias ViewRepresentable = NSViewRepresentable
#endif
This will make the rich text editor that we’ll create next cleaner, since it can implement the ViewRepresentable protocol without having to care about the platform differences.
Creating a rich text editor for SwiftUI
To use these new, platform-specific text views in SwiftUI, we can create a RichTextEditor view that wraps either of the two views depending on which platform we’re on:
#if os(iOS) || os(macOS) || os(tvOS)
import SwiftUI

public struct RichTextEditor: ViewRepresentable {

    public init(text: Binding<NSAttributedString>) {
        self._attributedString = text
    }


    @Binding
    public var attributedString: NSAttributedString


    #if os(iOS) || os(tvOS)
    public let textView = RichTextView()

    public func makeUIView(context: Context) -> some UIView {
        textView.attributedString = attributedString
        return textView
    }

    public func updateUIView(_ view: UIViewType, context: Context) {}
    #endif

    #if os(macOS)
    public let scrollView = RichTextView.scrollableTextView()

    public var textView: RichTextView {
        scrollView.documentView as? RichTextView ?? RichTextView()
    }

    public func makeNSView(context: Context) -> some NSView {
        textView.attributedString = attributedString
        return scrollView
    }

    public func updateNSView(_ view: NSViewType, context: Context) {}
    #endif
}
#endif
To create a rich text editor, we have to provide it with an NSAttributedString binding. This can be any custom string that comes from e.g. a document in a document-based app. The editor will be able to display and edit the rich text that we provide.
The code above shows one of my first AppKit learnings, as I started porting it to macOS. While iOS and tvOS just use the RichTextView that we created earlier, the macOS version didn’t scroll when using the same approach.
In AppKit, you must create a scroll view from the text view type that you want to use, cast its documentView to get a text view, then use the scrollView to get the scrollable behavior. We must therefore add a textView property to the protocol, since it may not be the view.
We’re now ready to take the text editor for a test ride! Let’s create a test app with a plain text binding and add a TextEditor to its content view…
…and notice that something’s missing. If you edit the text in the editor, then print the text, or add a Text view that shows it, you’ll notice that typing in the text field doesn’t update it.
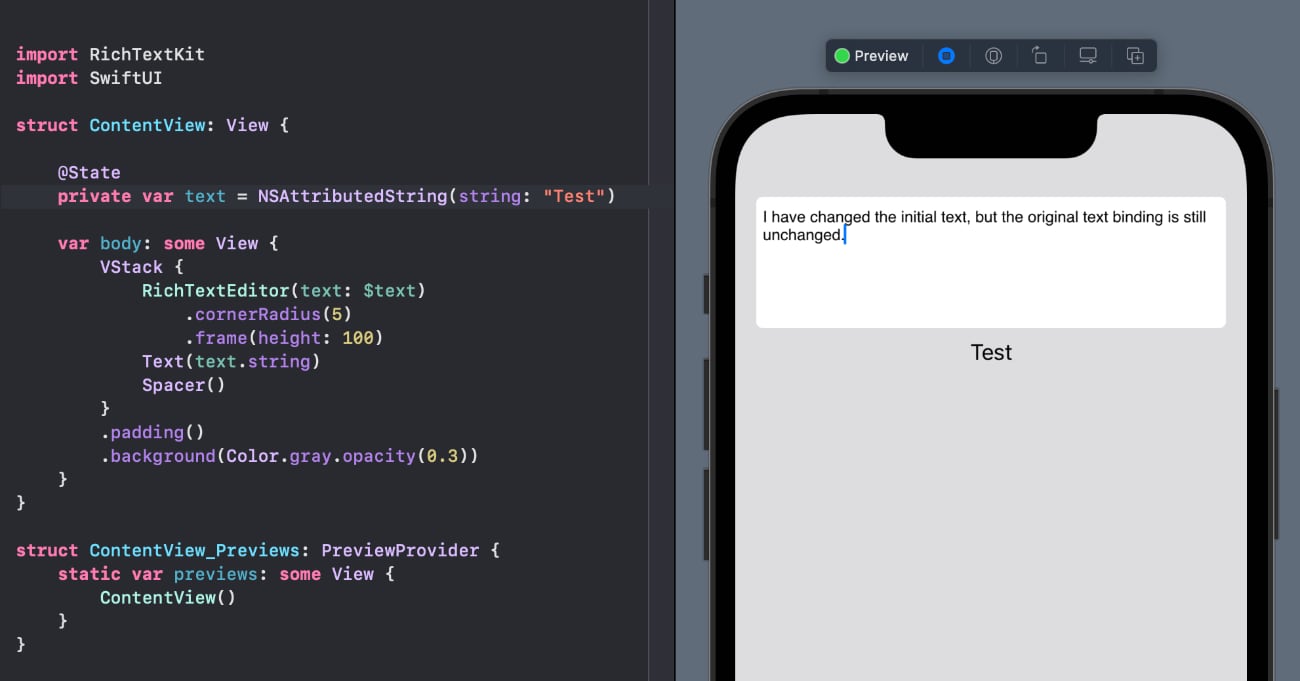
In the image above, I have typed in the text field, but the Text view still shows the original text. This is because we never write back any changes to the text binding. Let’s fix that.
Syncing changes
To listen for changes in the text editor and sync them back to the text binding, we need to implement text view delegation. However, since TextEditor is a struct, it can’t be used as the text view delegate.
We can solve this by adding a coordinator to the editor and use it as the delegate. Let’s create a RichTextCoordinator and use it to coordinate changes between SwiftUI and the underlying views.
#if os(iOS) || os(macOS) || os(tvOS)
import SwiftUI

open class RichTextCoordinator: NSObject {

    public init(
        text: Binding<NSAttributedString>,
        textView: RichTextView) {
        textView.attributedString = text.wrappedValue
        self.text = text
        self.textView = textView
        super.init()
        self.textView.delegate = self
    }

    public var text: Binding<NSAttributedString>

    public private(set) var textView: RichTextView
}
#endif
The coordinator is given a text binding and a RichTextView and will sync changes between both. We can also remove setting the attributedString in the editor, since the coordinator handles this for us.
To set the coordinator as the text view delegate, we first have to let it implement both the UITextViewDelegate and the NSTextViewDelegate protocol.
#if os(iOS) || os(tvOS)
import UIKit

extension RichTextCoordinator: UITextViewDelegate {}

#elseif os(macOS)
import AppKit

extension RichTextCoordinator: NSTextViewDelegate {}
#endif
We can now set the coordinator as the text view delegate in the RichTextCoordinator init:
open class RichTextCoordinator: NSObject {

    public init(
        text: Binding<NSAttributedString>,
        textView: RichTextView) {
        textView.attributedString = text.wrappedValue
        self.text = text
        self.textView = textView
        super.init()
        textView.delegate = self // <-- New line!
    }

    ...
}
For the coordinator to actually do anything, we must implement a few delegate functions. Before we do, let’s first add a way to sync the text binding with the text view:
private extension RichTextEditorCoordinator {

    func syncWithTextView() {
        syncTextWithTextView()
    }

    func syncTextWithTextView() {
        if text.wrappedValue == textView.attributedString { return }
        text.wrappedValue = textView.attributedString
    }
}
We can now setup the (so far limited) delegate handling to update the text binding when we type in the text view or changes its selection:
open class RichTextCoordinator: NSObject {

    ...

    #if canImport(UIKit)

    open func textViewDidChange(_ textView: UITextView) {
        syncWithTextView()
    }

    open func textViewDidChangeSelection(_ textView: UITextView) {
        syncWithTextView()
    }

    #endif

    #if canImport(AppKit)

    open func textDidChange(_ notification: Notification) {
        syncWithTextView()
    }

    open func textViewDidChangeSelection(_ notification: Notification) {
        syncWithTextView()
    }

    #endif
}
The coordinator will now sync changes back to the text binding. Still, if we run the test app, the text still doesn’t update. This is because we haven’t put the coordinator to use yet.
We can fix this by making the editor setup a RichTextCoordinator in makeCoordinator:
public struct RichTextEditor: ViewRepresentable {

    ...

    public func makeCoordinator() -> RichTextCoordinator {
        RichTextCoordinator(
            text: text,
            textView: textView)
    }
}
If we run the app again, you’ll see that the text is now updated when we type in the editor. This is because the coordinator listens to the text field and updates the text binding for us.
Let’s now look at how to change text style and let us toggle bold, italic and underline for the current position or selection in our rich text editor.
Working with text styles
To support text styles, we have to find a way to get & set bold, italic, underlined, etc. This isn’t as straightforward as it seems. Bold & italic are symbolic font traits, while underline is a text attribute. This means that we have to handle different styles in different ways.
UIKit & AppKit adds even more differences to the mix, which complicates things further.
We can use attributes(at:effectiveRange:) to get text attributes from an attributed string. However, ranges are dangerous, since using invalid ranges will cause the code to crash.
Therefore, let’s add a safeRange to NSAtrributedString, to shield us from invalid ranges:
public extension NSAttributedString {

    func safeRange(for range: NSRange) -> NSRange {
        NSRange(
            location: max(0, min(length-1, range.location)),
            length: min(range.length, max(0, length - range.location)))
    }
}
We can now add NSAtrributedString extensions to fetch attributes at a certain range:
public extension NSAttributedString {

    func textAttribute<Value>(_ key: Key, at range: NSRange) -> Value? {
        textAttributes(at: range)[key] as? Value
    }

    func textAttributes(at range: NSRange) -> [Key: Any] {
        if length == 0 { return [:] }
        let range = safeRange(for: range)
        return attributes(at: range.location, effectiveRange: nil)
    }
}
Let’s add another extension for setting attributes at a certain range. Note that we need to extend NSMutableAttributedString instead of NSAttributedString:
public extension NSMutableAttributedString {

    func setTextAttribute(_ key: Key, to newValue: Any, at range: NSRange) {
        let range = safeRange(for: range)
        guard length > 0, range.location >= 0 else { return }
        beginEditing()
        enumerateAttribute(key, in: range, options: .init()) { value, range, _ in
            removeAttribute(key, range: range)
            addAttribute(key, value: newValue, range: range)
            fixAttributes(in: range)
        }
        endEditing()
    }
}
Phew, that’s a mouthful. Still, these extensions will now help us get and set text attributes like .font, .underlineStyle etc. using a clean api.
Traits like bold and italic can however not be handled with attributes. Instead, we have to use fonts. Going through this would make the post very long, so let’s use the extensions above for now, although they are intended to be used internally in the library.
Changing text styles
If we use UIKit & AppKit, the TextView and its attributed string is already able to get and set attributes, which means that we could for instance toggle underline, change font etc.
In SwiftUI, however, we have to find a way to observe the current state of the text view, like we did when we synced text view changes back to the text binding. For traits & attributes, we need to find a way to manage that state in an observable way.
We can solve this by introducing a new, observable class that we can use to keep track of the current state of the text view. Let’s call it RichTextContext.
public class RichTextContext: ObservableObject {

    public init() {}
}
Let’s then adjust the RichTextEditor and RichTextCoordinator to require such a context:
public struct RichTextEditor: ViewRepresentable {

    public init(
        text: Binding<NSAttributedString>,
        context: RichTextContext) {
        self.text = text
        self._richTextContext = ObservedObject(wrappedValue: context)
    }

    private var text: Binding<NSAttributedString>

    @ObservedObject
    private var richTextContext: RichTextContext

    ...
}
open class RichTextCoordinator: NSObject {

    public init(
        text: Binding<NSAttributedString>,
        textView: RichTextView,
        context: RichTextContext) {
        textView.attributedString = text.wrappedValue
        self.text = text
        self.textView = textView
        self.context = context
        super.init()
        self.textView.delegate = self
    }

    public var context: RichTextContext

    ...
}
We can now add observable properties to the context, for instance if the text is underlined:
public class RichTextContext: ObservableObject {

    ...

    @Published
    public var isUnderlined = false

    ...
}
We can then use the same text view delegation as before to sync this information with the context when the text view’s text or position changes:
private extension RichTextCoordinator {

    func syncWithTextView() {
        syncContextWithTextView()
        syncTextWithTextView()
    }

    func syncContextWithTextView() {
        let string = textView.attributedString
        let attributes = string.textAttributes(at: textView.selectedRange)
        let isUnderlined = (attributes[.underlineStyle] as? Int) == 1
        context.isUnderlined = isUnderlined
    }

    ...
}
The code is still rough even though we added a textAttributes(at:) function to the text view. This is why we should add more extensions later, to make these operations easier.
You can now add a @StateObject private var context = RichTextContext() to the test app and pass it into the RichTextEditor. When you move the cursor, the coordinator will sync the underline information with the context, which you can then use as you wish in SwiftUI.
However, we currently have no way to make the rich text underlined from SwiftUI. We have the required functionality, but no way to trigger it. Since SwiftUI views are structs, we have no view reference that a button could use. We have to find another way.
Turns out that we actually just added a way to solve this - the context. If we can somehow observe context changes, we could fix so that changing the context’s isUnderlined would tell something with access to the text view to act on that change.
Turns out we have this thing as well - the coordinator! The coordinator could use Combine to observe the context, then apply changes directly to the native text view, which in turn would update the text binding.
Let’s first add a way for the coordinator to store context observables:
open class RichTextEditorCoordinator: NSObject, RichTextPresenter {

    ...

    public var cancellables = Set<AnyCancellable>()

    ...
}
Then let’s add a way for the coordinator to subscribe to context changes:
open class RichTextEditorCoordinator: NSObject, RichTextPresenter {

    public init(
        text: Binding<NSAttributedString>,
        textView: RichTextView,
        textContext: RichTextContext) {
        ...
        subscribeToContextChanges()
    }

    ...
}

private extension RichTextEditorCoordinator {

    func subscribeToContextChanges() {
        subscribeToIsUnderlined()
    }

    func subscribeToIsUnderlined() {
        richTextContext.$isUnderlined
            .sink(
                receiveCompletion: { _ in },
                receiveValue: { [weak self] in self?.setIsUnderlined(to: $0) })
            .store(in: &cancellables)
    }

    func setIsUnderlined(to newValue: Bool) {
        let string = textView.attributedString
        let attributes = string.textAttributes(at: textView.selectedRange)
        let isUnderlined = (attributes[.underlineStyle] as? Int) == 1
        if newValue == isUnderlined { return }
        let value = NSNumber(value: newValue)
        // How to set the text attribute??
    }
}
Since we had to duplicate the isUnderlined logic from earlier. This is an indication (and the content for another post) that we should find a way to simplify this logic further.
Let’s leave it for now, and instead discuss how to set this new attribute. We can’t change the text view’s attributedString since it’s not mutable, so we must find another way.
Turns out that UIKit has a non-optional textStorage, while NSKit has an optional one. Let’s use these to add a mutableAttributedString to the text views:
public protocol RichTextViewRepresentable {

    ...

    var mutableAttributedString: NSMutableAttributedString? { get }
}

// Then add this to both the UIKit and AppKit view
public extension RichTextView {

    var mutableAttributedString: NSMutableAttributedString? {
        textStorage
    }
}
We can now use the mutableAttributedString to set the underline style:
private extension RichTextEditorCoordinator {

    ...

    func setIsUnderlined(to newValue: Bool) {
        ...
        textView
            .mutableAttributedString
            .setCurrentTextAttribute(.underlineStyle, to: value)
    }
}
With that, we’re done (for now)! The coordinator will write to the context whenever the text view’s text or position changes, and will sync any context changes bck to the text view.
Trying it out
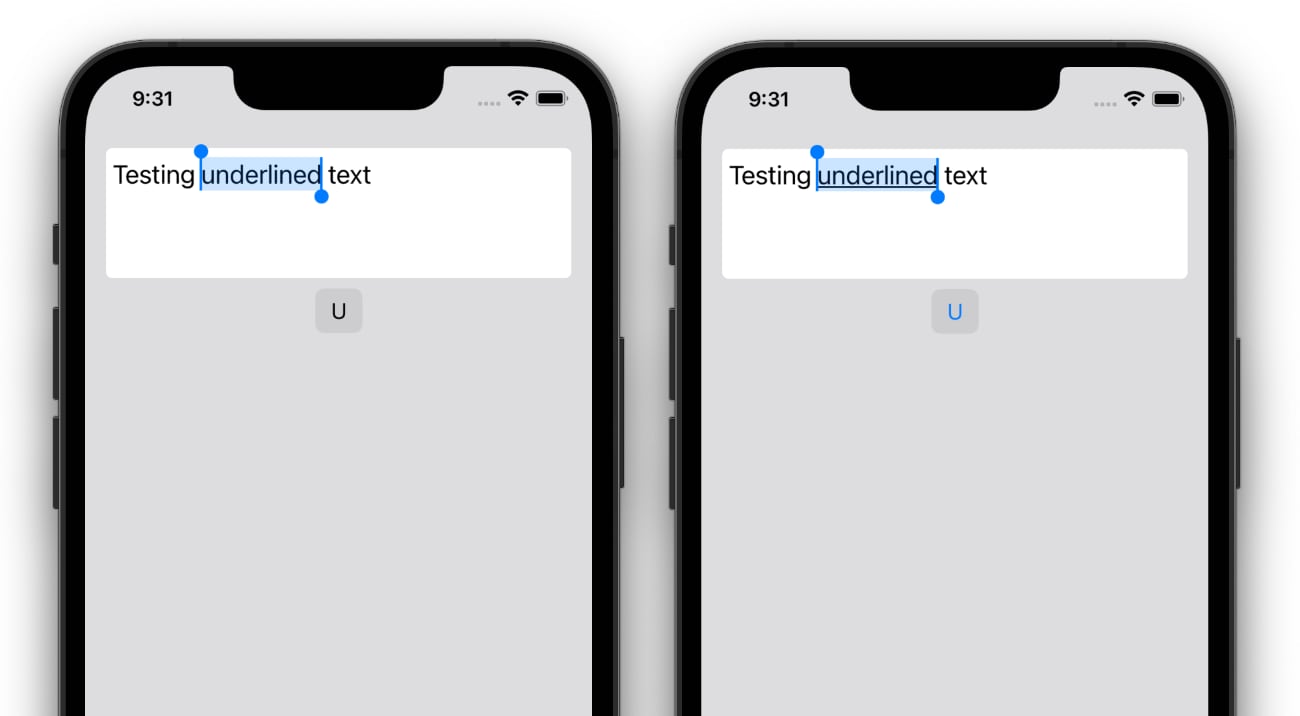
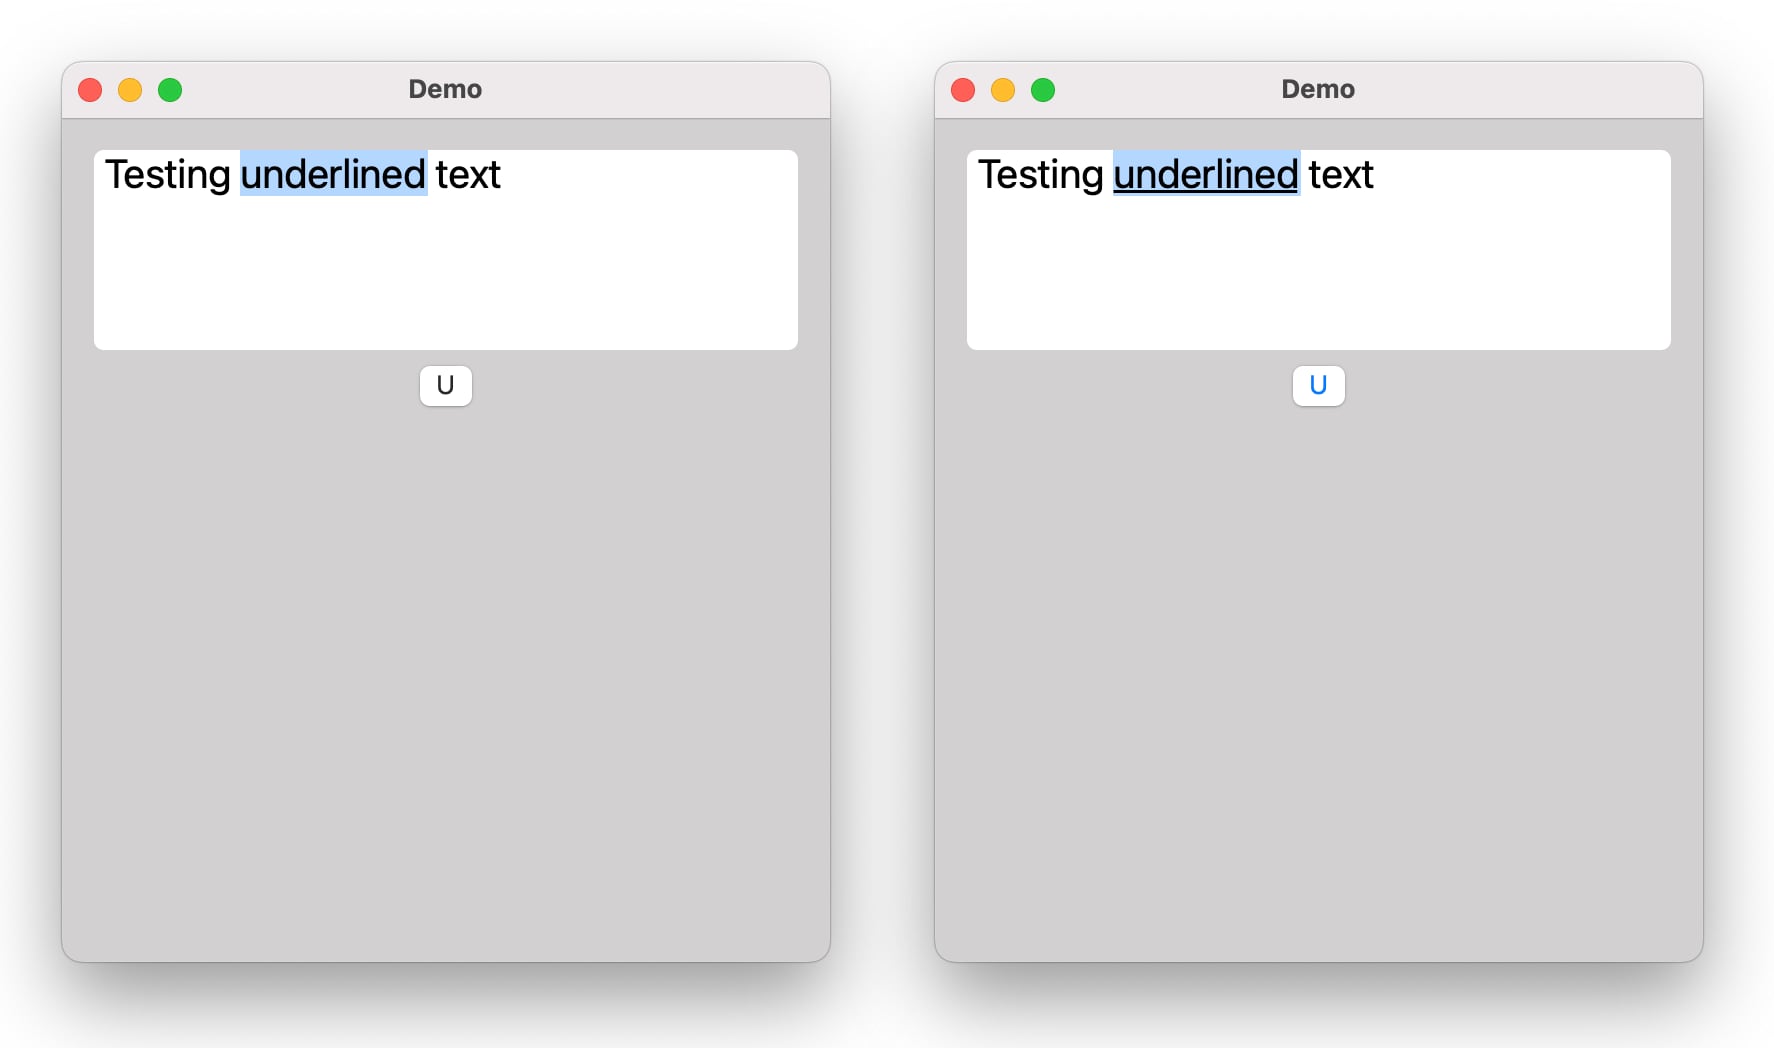
We can now add a button to our test app and have it highlight when the rich text context indicates that the current text is underlined. We can also tap the button to toggle a style:
There are still tons to do to make attribute and trait management easier, and we haven’t even started looking at more advanced features like image support.
However, we now have a solid, multi-platform foundation that we can expand further, so feel free to chip in if you want to extend it with more features.
Introducing RichTextKit
This post has highlighted some of the complicated APIs that we have to use when working with rich text. Much behaves differently between platforms and much is missing in SwiftUI.
I’ve spent many hours on strange edge cases, and have searched all over to find clues in 10+ years old Objective-C posts etc. It’s gone ok, but not great.
Since I implemented all the rich text functionality in this post while working for a company called Oribi, we both felt that it’s a waste that every developer has to reinvent the wheel and handle the same limitations every time a new rich text-based app is to be developed.
I’m therefore happy to announce that we’ll be making all this available as an open-source library! It is called RichTextKit and makes working with rich text a lot easier.

RichTextKit is under development, but already has the functionality in this post, as well as functionality to work with attributes, styles, traits, images, etc. It also has a demo app.
If you think rich text is exciting, I’d love for you to try it out and give me feedback. Together, we can make rich text on Apple’s platforms much more fun than it is today.
Discussions & More
If you found this interesting, please share your thoughts on Bluesky and Mastodon. Make sure to follow to be notified when new content is published.