Generate a game board map from a bitmap
Feb 21, 2010 ·
I’m building an adventure board game in XNA, where missions take place on a board that is made up of square tiles. It’s a lot like the amazing, old board game Hero Quest.
In this post, I’ll describe how my custom game engine generates a board from any bitmap.
The engine defines a set of item types that can be placed on the board, like characters, doors, furnitures etc. as well as how each item can interact with the board.
For instance, characters can move, while static objects can not. Doors let characters pass into other rooms, and can be seen through, while rubble blocks vision and passage. Book shelves and chests can contain treasures and blocks passages, but don’t block vision, etc.
To make these kind of missions seamless to create, the game engine can use bitmap files to let you quickly create a mission map. Before we look at how, some relevant information.
Board movement
Players and computer controlled enemies can move sideways, but not diagonally:
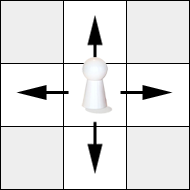
Factors that limit if a game piece can move from one tile to another (tile A to tile B) are:
- B doesn’t exist (the piece would move outside of the board).
- B exists but is marked as
NoneorNonwalkable(see below). - B belongs to another room and is separated from A by a wall.
- B is occupied by a piece or furniture (characters can’t stop here).
- B is occupied by a player or enemy (characters can’t pass each other).
All these rules are handled by a bunch of tile-related functions, that take a player or enemy and decide whether or not the character can move to a tile.
Tile types
I have chosen to limit myself to three different tile types:
None- the tile has no properties and is ignored.NonWalkable- the tile can not be stepped on, e.g. a wall.Walkable- the tile can be stepped on, and also stopped on.
None is used to separate tiles that are not part of the mission from tiles that are. It can be used to create empty spaces, e.g. surrounding a hallway.
Mission data
Players can play several missions that takes place on the same base board, but that use different maps, and can also handle completely custom maps.
To make it easy to create a missions of different kinds, the game engine works like this:
- The mission map is specified in a bitmap file.
- The mission data is specified in an XML file.
When a mission is loaded, the XML file is parsed into a Mission object. The file refers to the bitmap, which is parsed into a mission board map.
The board map specifies the tiles, which determines the look of the board, while the XML file specifies everything else, like the mission name, the mission targets, board items etc.
Bitmap parsing overview
Consider the following example 6x6 pixel bitmap:

When the mission is initialized, it goes through the following steps:
- Parse the XML file.
- Parse the bitmap into a mission board.
- Initialize each tile using the bitmap colors.
- Divide the board tiles into individual rooms.
I have chosen to handle bitmap colors as such:
- Black corresponds to the
Nonetile type. - The light grey at (0,2) and (0,3) corresponds to a
Nonwalkabletile. - All other colors are (for now) regarded to be regular
Walkabletiles.
The bitmap colors are used to determine which image texture to use for each tile:
- Black tiles (
None) are not handled at all and have no image. - All other colors are mapped to hex code (#ffffff instead of White).
- If any texture files have the hex code in the name (ffffff_1.png) a random one is used.
- If no corresponding image exists, the color is used to tint a random ffffff_x.png image.
When all tiles have been initialized with a type, an image etc. they are divided into rooms. Adjacent tiles with the same color are considered to belong to the same room.
When the board is later drawn, the game draws solid, non-passable walls between rooms.
The process is straightforward. I have not included the code for the Board and Tile types, since they are quite complex and I just want to describe the general concept.
Step 1: Initialize the mission board
In my model, the Board class has an Initialize function, that takes an image parameter:
public void Initialize(Texture2D image)
{
    InitializeTiles(image);
    InitializeRooms();
}
This function first initializes all tiles on the board, then divides the tiles into separate rooms.
Step 2: Initialize each tile
The InitializeTiles function maps the texture to a color array and applies each color to the corresponding tile:
private void InitializeTiles(Texture2D image)
{
    //Convert image to colors
    Color[] colors = new Color[image.Width * image.Height];
    image.GetData<Color>(colors);

    //Initialize the board tile matrix
    Tiles = new Tile[image.Width, image.Height];

    //Initialize each tile in the grid
    for (int y = 0; y < Tiles.GetLength(1); y++)
    {
        for (int x = 0; x < Tiles.GetLength(0); x++)
        {
            Tiles[x, y] = new Tile(colors[x + y * image.Width]);
        }
    }
}
I have reduced the number of constructor parameters in this code to make it easier to read.
The Tile constructor uses the provided color to set its Image, Type and Tint. However, since it’s specific to my game, I decided to leave the constructor out of this post.
Step 3: Divide the board tiles into rooms
Once a board has a grid of tiles, the engine divides them into rooms, using three functions.
InitializeRooms makes sure that all tiles are handled at least once:
private void InitializeRooms()
{
    for (int y = 0; y < Tiles.GetLength(1); y++)
    {
        for (int x = 0; x < Tiles.GetLength(0); x++)
        {
            InitializeRooms(Tiles[x, y]);
        }
    }
}
A second InitializeRooms function takes a tile and ensures that it fetches the room index from already initialized adjacent tiles that belong to the same room (if any).
The function then sets a new room index, if needed, then spreads the room index to non-initialized adjacent tiles that belong to the same room.
For now, the function uses two sub-functions that cleans up the code a bit:
private void InitializeRooms(Tile tile)
{
    //Abort if no tile or if already checked
    if (tile == null || tile.RoomIndex.HasValue) { return; }

    //Set negative room index if no tile or non walkable
    if (tile.TileType == TileType.None || tile.TileType == TileType.Unwalkable)
    {
        tile.RoomIndex = -1;
    }

    //Fetch room number from similar siblings
    InitializeRooms_Fetch(tile, tile.TopSibling);
    InitializeRooms_Fetch(tile, tile.LeftSibling);
    InitializeRooms_Fetch(tile, tile.RightSibling);
    InitializeRooms_Fetch(tile, tile.BottomSibling);

    //Set room number if none has been set
    if (!tile.RoomIndex.HasValue)
    {
        tile.RoomIndex = roomIndex++;
    }

    //Spread room number to similar siblings
    InitializeRooms_Spread(tile, tile.TopSibling);
    InitializeRooms_Spread(tile, tile.LeftSibling);
    InitializeRooms_Spread(tile, tile.RightSibling);
    InitializeRooms_Spread(tile, tile.BottomSibling);
}
private void InitializeRooms_Fetch(Tile tile, Tile sibling)
{
    //Abort if either tile is null
    if (tile == null || sibling == null) { return; }

    //Fetch index if the tiles have the same color
    if (sibling.RoomIndex.HasValue && tile.Color == sibling.Color)
    {
        tile.RoomIndex = sibling.RoomIndex;
    }
}
private void InitializeRooms_Spread(Tile tile, Tile sibling)
{
    //Abort if either tile is null
    if (tile == null || sibling == null) { return; }

    //Spread by initializing the sibling
    if (tile.RoomIndex.HasValue && tile.Color == sibling.Color)
    {
        InitializeRooms(sibling);
    }
}
Example
The steps above are all you need to parse a bitmap into an playable map.
In the demo below, I have 12 “ffffff” images and 4 “c3c3c3” images. I have no image for the red or dark grey rooms, so they use the same hallway images and tint them.
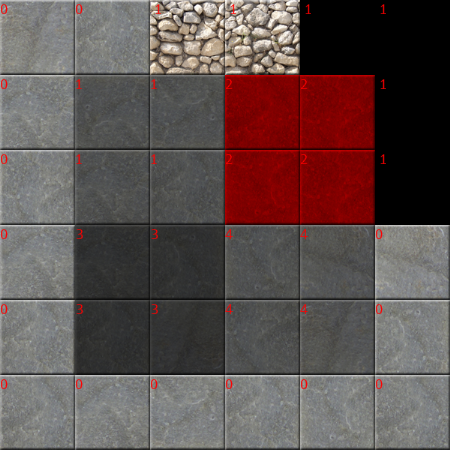
The image below shows the room index. As you can see, None and NonWalkable tiles are given a room index of -1, while all other tiles are separated into room 1-4.
This makes it easy to create a different map for another mission, or adjust the map above.
Discussions & More
If you found this interesting, please share your thoughts on Bluesky and Mastodon. Make sure to follow to be notified when new content is published.